Send ERC20 Tokens to Multiple Wallets in One Transaction
Learn how to send ERC20 tokens to multiple wallets in one transaction. Step-by-step tutorial, save up to 90% on gas fees, no coding required.

Sending ERC20 tokens to 100 wallets one by one costs around $200 in gas on Ethereum and takes over an hour of clicking. There's a faster, cheaper way: bundle every transfer into a single transaction.
This guide shows you exactly how to send ERC20 tokens to multiple wallets in minutes — no coding, no smart contract deployment, no spreadsheet headache. Just a wallet, a list of addresses, and a couple of signatures.
TL;DR
- What you'll do: send ERC20 tokens (USDC, USDT, your custom token, etc.) to as many wallets as you need in a single batched transaction.
- What you need: a Web3 wallet (MetaMask, WalletConnect or Coinbase Wallet), some ERC20 tokens, and a small amount of the chain's native token for gas.
- Time: under 5 minutes.
- Cost: typically 70–90% cheaper than sending one transaction per recipient.
Skip the tutorial — open Metasender now
Why batch transfer ERC20 tokens?
If you're a DAO distributing rewards, a project running an airdrop, or a team paying contributors, sending tokens one transaction at a time is wasteful. Each transfer pays the same intrinsic gas cost, plus the contract call overhead, plus a wallet popup to sign.
A batch transfer aggregates every transfer into one on-chain transaction. You pay the base gas cost once instead of N times.
Prerequisites
Before starting, make sure you have:
- A Web3 wallet — MetaMask, WalletConnect, Coinbase Wallet, or any EVM compatible wallet.
- The ERC20 tokens you want to send — held in the connected wallet.
- Native gas tokens — ETH on Ethereum, POL on Polygon, etc., enough to cover the transaction fees.
- A list of recipients with amounts — ready to paste row by row, or as a CSV file.
Supported networks include Ethereum, Polygon, Base, Arbitrum, Optimism, Avalanche, BNB Chain, Linea and more, plus their testnets (Sepolia, BSC Testnet, Avalanche Fuji).
Step-by-step: send ERC20 tokens to multiple wallets
The flow has three phases: Prepare → Approve → Send. You'll see the progress at the top of the page at all times.
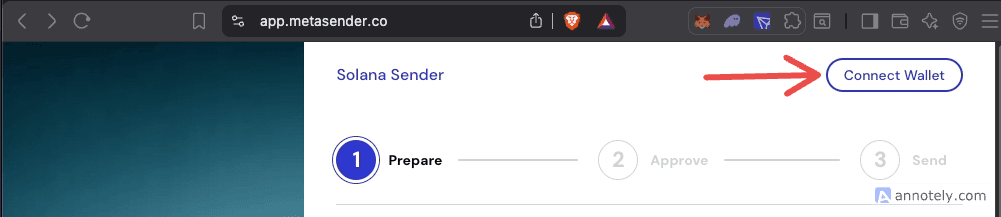
Step 1 — Open Metasender and connect your wallet
Go to app.metasender.co.
Click Connect Wallet in the top-right corner. Pick your wallet provider (MetaMask, WalletConnect, Coinbase Wallet) and approve the connection request.
Step 2 — Select the blockchain
Click the Select your blockchain dropdown. Pick the chain that holds your ERC20 tokens — Ethereum, Polygon, Base, Arbitrum, Optimism, Avalanche, BNB Chain, Linea and more.
If your wallet is connected to a different network, Metasender prompts the wallet to switch automatically.

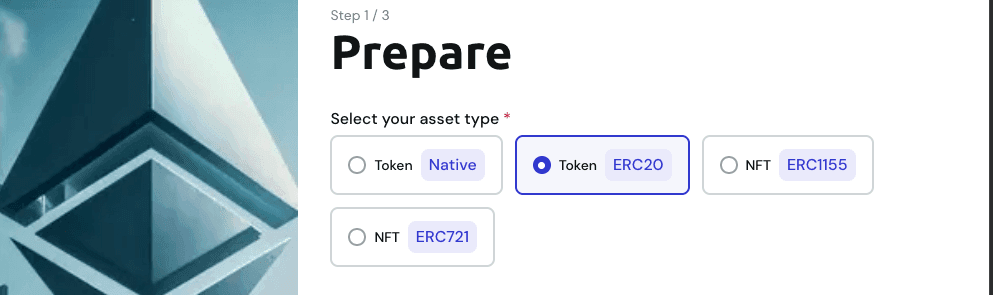
Step 3 — Choose ERC20 as the asset type
Under Select your asset type, pick Token / ERC20.
The other options (Native, ERC721, ERC1155) are for native gas tokens (like ETH itself) and NFTs.
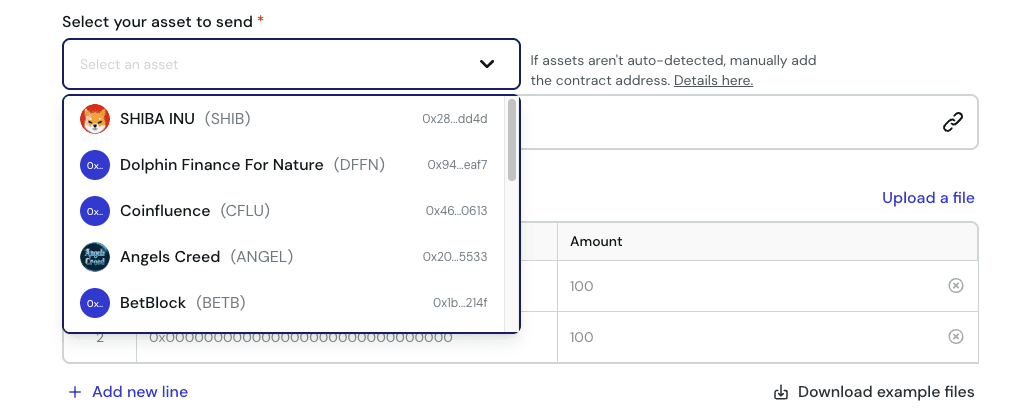
Step 4 — Pick the ERC20 token to send
Once your wallet is connected, Metasender automatically scans it and lists every ERC20 token detected, with its logo and name.
Click Select your asset to send and choose your token from the dropdown.
Skip the tutorial
Distribute your tokens to multiple wallets in 30 seconds — free, no signup.
If your token isn't auto-detected (rare for less common tokens), paste the contract address manually in the Enter the asset contract address field. Metasender resolves the token info from the contract directly.
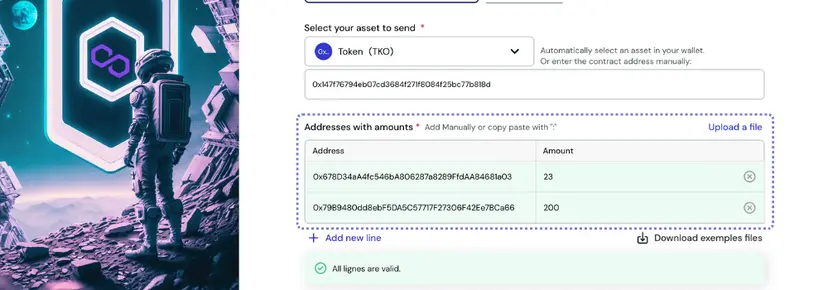
Step 5 — Add the recipients
Now the important part: provide your list of recipient addresses with amounts. Two options.
Option A — Manual entry
Type or paste each recipient's address and the amount of tokens to send. Metasender validates each row in real time:
- Green border — valid address and amount
- Red border — invalid address or amount
Click Add new line to add more rows. The table scrolls infinitely as you grow the list.
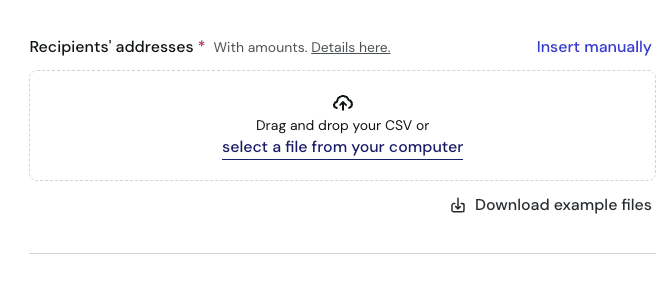
Option B — CSV upload
Click Upload a file and drop your CSV. The expected format is straightforward:
address,amount
0x742d35Cc6634C0532925a3b844Bc7e7595f0bEb0,100
0x1234567890abcdef1234567890abcdef12345678,50.5
0xabcdef1234567890abcdef1234567890abcdef12,200
A header row is optional. Decimals are allowed in amounts (Metasender handles the on-chain decimal conversion automatically).
You can grab a sample CSV from the Download example files button.
Step 6 — Review and click Next
Once every row is valid, click Next at the bottom of the page.
Metasender shows an estimated gas fee in the top-right corner so you can sanity-check before continuing. The exact fee is computed on the next step.
Step 7 — Approve the token spend
You're now on Step 2: Approve.
This step is specific to ERC20 tokens: before Metasender can move your tokens, you need to grant it permission via the standard ERC20 approve() function. This is a one-time authorization per token, per chain.
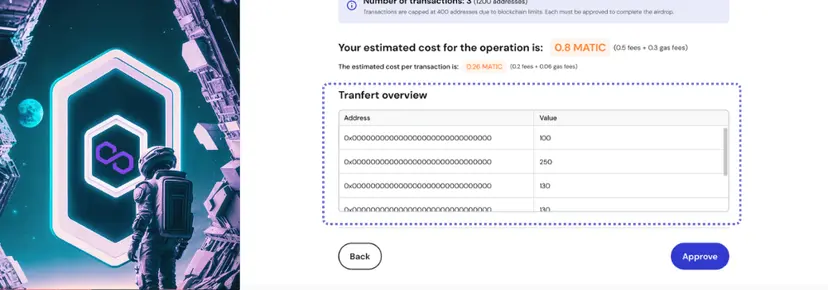
The screen displays:
- Estimated total cost — Metasender fee + estimated gas
- Per-transaction cost — shown if you have more than 400 recipients (Metasender splits into batches)
- Transfer overview — read-only preview of every recipient and amount
Click Approve. Your wallet pops up asking you to sign the approval transaction.
Step 8 — Sign the send transaction(s)
Once the approval confirms (a few seconds), Metasender automatically advances to Step 3: Send and prompts your wallet to sign the actual batch send transaction.
If you have more than 400 recipients, Metasender splits the operation into multiple transactions (capped at 400 each due to blockchain gas limits). You sign one per batch.
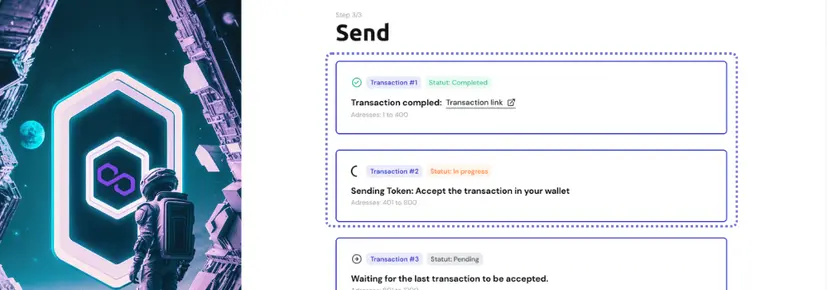
Step 9 — Confirm completion
When all transactions are mined, you'll see:
- ✅ Status: Completed badge on each transaction card
- 🔗 Transaction link — clickable, opens the block explorer to verify the transfer on-chain
- A list showing which recipient range each batch covered
That's it — your ERC20 tokens are now distributed.

How much does it cost?
Two cost components apply to every batch transfer:
- Metasender fee — a flat fee per transaction batch, typically ~$20 to $60 depending on the chain and the price of its native token. Use the fee estimator on the home page to get the exact cost for your batch before you start.
- Gas fee — standard network fee for executing the transaction, depends on gas price and transaction size.
Compared to sending tokens one by one, you typically save 70–90% on total gas. The savings come from amortizing the base gas cost (21,000 gas intrinsic + contract call overhead) across many recipients in a single transaction.
Common mistakes to avoid
- Forgetting to fund the wallet with native gas. You need ETH on Ethereum, POL on Polygon, etc. The ERC20 token alone is not enough to pay for gas.
- Pasting addresses with extra spaces or invalid characters. Metasender validates each address, but cleaning your CSV first saves time.
- Confusing decimals. Always use the human-readable amount (e.g.,
100.5USDC), not the raw on-chain integer. Metasender handles the decimal conversion automatically. - Wrong chain. Always verify the connected chain matches where your tokens live before clicking Approve.
- Closing the tab during signing. If you close the browser between approval and send, you may have to re-approve. Wait for the success state before leaving.
FAQ
How many wallets can I send to in one transaction? Up to 400 recipients per transaction. Above that, Metasender automatically splits into multiple batches and asks you to sign one transaction per batch.
Does it work with custom ERC20 tokens? Yes. Any token implementing the ERC20 standard works, even if it's not auto-detected by Metasender. Just paste the contract address manually in Step 4.
Is there a minimum or maximum amount? No minimum. The maximum per recipient is bounded only by your wallet balance.
Do I need to deploy a smart contract?
No. Metasender's contract is already deployed on every supported chain. You only sign two transactions: an approve and a send.
Can I use it for ERC721 NFTs or ERC1155 tokens? Yes. Metasender supports ERC721 and ERC1155 batch transfers as well — pick the matching asset type in Step 3. Need help with NFTs? Check the tutorial page.
What if a transaction fails? The interface flags failed transactions in red with a link to the explorer. Successful batches stay confirmed; you can retry only the failed ones without redoing the rest.
Which chains are supported? Ethereum, Polygon, BNB Chain, Avalanche, Base, Arbitrum, Optimism, Linea, Scroll, Blast, Cronos, Metis, Gnosis, Moonbeam, Moonriver, Mantle, zkSync and Vanar — plus the testnets Sepolia, BSC Testnet and Avalanche Fuji. Open the chain selector in the app for the full up-to-date list.
Ready to send?
Stop pasting addresses one by one. Distribute your ERC20 tokens to dozens, hundreds or thousands of wallets in a single transaction.
Ready to send?
Stop pasting addresses one by one. Distribute tokens to thousands of wallets in a single transaction.
